Metallic finish for 3d printed plastic models
We thought we would walk you through the process we use to give plastic printed models a nice metallic finish.
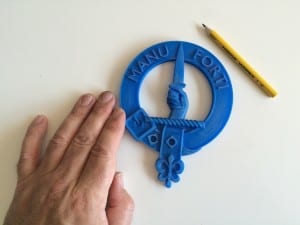
We started with our clan MacKay crest and scaled it up to print on our 3d printer.

The material is a blue PLA filament and we used high quality setting to ensure a smooth surface.
First thing to note here is that it often does not work to simply scale a model to create a larger version. Although we are happy with the result, for this model, the proportions would have looked even better if the model had been scaled so that it was proportionally thinner front-to-back. However, we are pressing ahead with our “chunky” version.


We did a bit of light sanding with a fine grade sand paper, but thanks to the high quality settings for the print, the amount of initial clean-up was minimal.
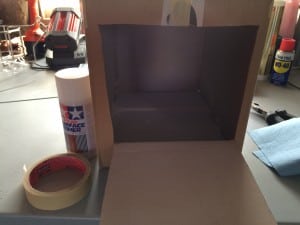
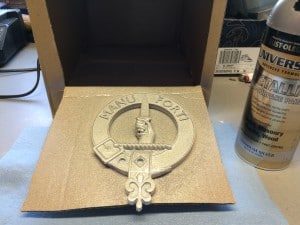
Next, we prepared to spray a white base-coat. We cut a flap in a cardboard box to create an enclosed space to contain the spray-paint. We also used a piece cut from a wire coat-hanger inserted through the top and formed into a hook to hang the model from during spraying. The hook also let us turn the model to spray the other side without getting in a mess or leaving finger-prints on the paintwork.
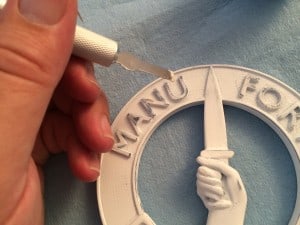
After drying, sand down any rough spots or paint drips in the primer layer. You will find that the primer will make any imperfections in the model surface more visible. Now is the time to sort any issues out before applying the final paint coats. We were short of model filler, but had some decorator’s filler lying around. The decorator’s filler worked just fine. If you are applying filler, make sure it dries properly and give it a sand with some fine-grade sandpaper.

Once you are happy that you have taken care of any rough spots, holes and blemishes, time to apply the top coats. Back to the cardboard box paint shop. For best results, apply multiple thin coats with a spray can, and do not allow paint drips to form. Also make sure you spray from different angles to get coverage in all the corners and recesses. Some patience here and building up little by little will really improve your results. This is also where the cardboard box comes in handy. You can easily move the model to a corner of your workshop to dry without making a mess of the wet paintwork.
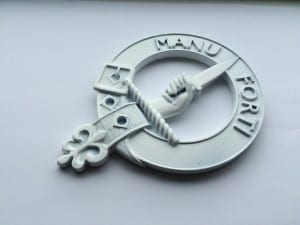
The next step is optional, but makes a big difference to the look of the model if you are going for a convincing look. We painted all the recessed areas with black enamel paint then, while still wet, immediately wiped off the black paint from the surface areas with a rag. You may need to use paint thinner and work quite fast to avoid the black paint drying in areas you don’t want it.

The final result with the black paint removed from surface areas but remaining in the recesses. You can leave this looking a bit weathered and messy (we like this look), or you can clean it up a bit more to achieve a more polished finish.

We would love to see what results you get, please post them below.


These crests would be ideal for using an electrochemical plating technique.
https://www.instructables.com/Copper-Electroforming-on-3d-Printed-PLAABS-Objects/